REVIEW · BRUGES
Bruges: Silver Ring-Making Workshop
Book on GetYourGuide →Operated by The Silver Hand · Bookable on GetYourGuide
A good souvenir should have a story behind it. In Bruges, you craft a sterling silver ring step by step, right at Bennett & Mason, and you end with something you actually made. I especially love the hands-on way you cut, shape, and finish your ring, and the fun option to stamp a personal message inside. One possible drawback: this is a working workshop with hand tools, so expect to get busy and listen closely to safety guidance.
You also get the kind of attention that happens when a group is capped at just 4 participants, with instruction in English. If you want a polished craft memory (not just another photo), this workshop is a very solid pick in the heart of Bruges.
In This Review
- Key things to know before you try ring-making in Bruges
- Ring-making in the heart of Bruges: Bennett & Mason setup
- Choosing your ring: style, finger, and the inside message that makes it personal
- From saw to shape: hammering, triblet, and the step-by-step craft rhythm
- Soldering is part of the lesson, not a magic trick
- Making it truly yours: textures, markings, and the three finishes
- What’s included (and what you’ll need to plan)
- Price and value: why $206 can feel fair here
- The 150 minutes: what the flow feels like from start to finish
- Who this Bruges workshop suits best (and who should skip)
- Practical tips that make the session smoother
- Should you book the Silver Ring-Making Workshop in Bruges?
- FAQ
- Where is the meeting point for the workshop?
- How long is the Bruges silver ring workshop?
- How many people are in the group?
- Is the instructor English-speaking?
- Do I need prior experience with jewellery tools or silverworking?
- What should I bring or wear to the workshop?
- What’s included in the price?
- Is the workshop suitable for children or wheelchair users?
Key things to know before you try ring-making in Bruges
- You make it yourself from recycled 925 sterling silver, and you take the ring home at the end
- You customize the inside with hand stamps for a name, date, or even a favorite beer
- Real tool time: cutting with a handsaw, hammering, filing, and shaping until it fits
- Soldering is part of the process, shown as a demonstration during the workshop
- Finish choices are part of the design, with polished, satin, or rough forged looks
- Small group, English instruction, plus drinks, tea/coffee, and light snacks
Ring-making in the heart of Bruges: Bennett & Mason setup
This workshop runs from inside Bennett & Mason, right in central Bruges. You’ll recognize it easily thanks to the large double red framed windows with the store logo on each window. If the door is closed, ring the bell.
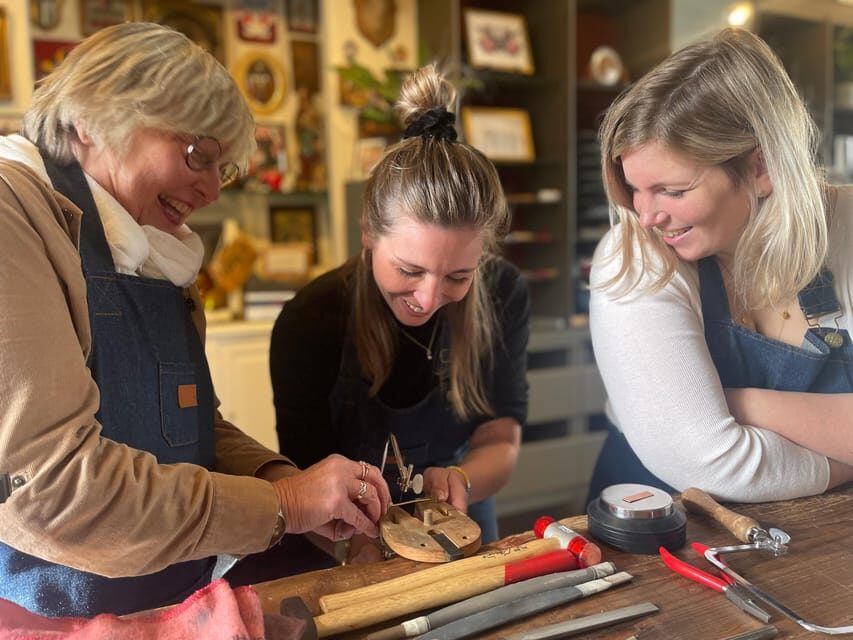
When you arrive, you’re not shuffled through a demo-and-watch format. You get set up like a real bench craft student: aprons on to keep you comfortable, a secure place to store luggage, and a simple, friendly start to the session. The tone in the room matters here. Several people highlight that the mood is relaxed and the guidance is calm, which is exactly what you want when you’re picking up saws, hammers, and files for the first time.
Price-wise, it’s not a casual add-on at $206 per person, but it’s also not just paying for time in a chair. The workshop includes materials (recycled 925 sterling silver) and the tools and teaching that go with learning the process. That’s a big reason this feels like value rather than a pricey activity that hands you a finished object later.
A few more Bruges tours and experiences worth a look


Choosing your ring: style, finger, and the inside message that makes it personal
The first meaningful step is picking your ring style and shape. This is where your ring starts looking like yours, not like something assembled from a catalog. You’ll choose what you want to wear and think about the finger you plan to use it on. Then it moves from idea to action: you measure your silver and cut it to the right size using a handsaw.
That sounds technical, but here’s the practical point: sizing is where lots of DIY hobbies fall apart. The workshop structure helps you avoid the common mistake of making something pretty that never quite fits. You’re guided through checking fit for comfort, then refining the ring to get it perfectly round.
Next comes one of the most fun parts: the inside stamping. You select from a variety of hand stamps and can add a custom message inside the band. You might go for the obvious (name, date), or something personal and specific to your life in that moment. One review even mentioned a beer-name choice as an option, and honestly, that’s the kind of detail that turns a ring into a memory you’ll actually wear for years.
If you’re planning what to stamp, keep it simple. Anything tight and readable inside a ring will win over long, complicated text. If you need reading help for small details, bring your reading glasses.
From saw to shape: hammering, triblet, and the step-by-step craft rhythm
Once the band is sized, the workshop shifts into shaping. You’ll use mallets and a triblet to hammer the silver into a rough ring shape. The triblet is one of those tools you only notice when you’re using it. It helps create a curved form so your ring starts taking on the round profile it needs.
This is where you’ll feel the workshop earn its keep: it doesn’t just tell you what tools exist. You get to handle them, with safety guidance throughout. People mention the explanations feel clear and the pace feels unhurried, which matters because early mistakes are usually caused by stress, not skill.
You’ll also refine the ring during the session. That includes checks for fit and comfort, plus adjustments so it becomes properly round. Expect a bit of back-and-forth: shape a little, check, adjust, smooth, and repeat. That loop is normal in metalwork, and it’s also why your final ring feels earned.
A small note if you’re worried about being uncoordinated: this isn’t about becoming a metalworker overnight. The workshop is set up so beginners can follow the steps. You’re learning the process by doing the process.
Soldering is part of the lesson, not a magic trick
At some point you’ll watch a demonstration of the soldering process. That includes heating and joining the silver to complete the ring’s shape.
Even if you don’t do every second of soldering yourself, the takeaway is important: you learn what happens when a ring needs to become one continuous piece. In metalwork terms, soldering is the hinge between rough shaping and a finished form that can withstand normal wear.
After that, the session continues with the finishing stages, where you make the outside look intentional. You’ll refine the shape, check everything again, and then move into surface texture and polish decisions.
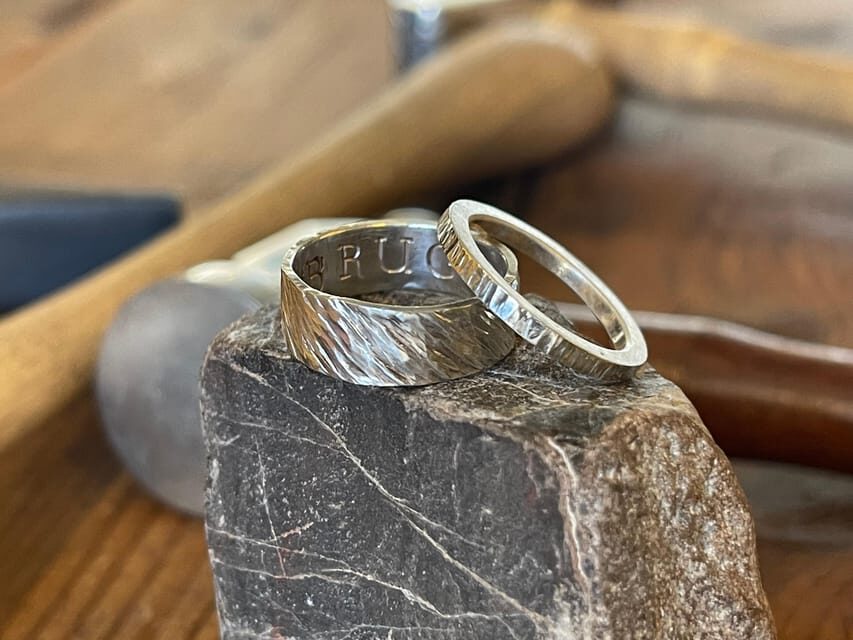
Making it truly yours: textures, markings, and the three finishes
One of the best parts of this workshop is that creativity isn’t limited to a stamp. You get to experiment with textures or add unique markings, so your ring can feel less generic and more like a personal signature.
Then you choose the final finish, and it changes the vibe of the ring fast:
- Polished for a brighter, more reflective look
- Satin for a softer sheen that looks smooth and modern
- Rough forged for a rustic, more handcrafted appearance
This choice is worth thinking about in advance, because it affects how your ring will look next to your skin tone, clothing, and other jewelry. Polished rings can read more formal. Satin often feels like a good everyday balance. Rough forged finishes can look amazing with a minimalist stack or paired with other textured pieces.
If you’re into tactile objects, rough forged is a great way to make sure the ring still carries the feel of the process. It’s not just a clean result; it’s a visible record of the workshop.


What’s included (and what you’ll need to plan)
You’re not expected to bring materials or tools. The workshop includes:
- All materials, including recycled 925 sterling silver
- Aprons to keep you clean
- Tea and coffee, plus soft drinks and water
- Small snacks (biscuits and chocolates)
- A secure place to store luggage
Not included: transportation to and from the workshop, and food beyond what’s provided here. Since the session is 150 minutes, it’s smart to plan a lunch or snack before you go, unless you’re totally okay with the workshop snacks.
The meeting place is inside Bennett & Mason in central Bruges, so you can typically combine this with a walk through the city after. Just don’t schedule a super tight window immediately afterward if you’re the type who likes to wander slowly.
Price and value: why $206 can feel fair here
At $206 per person for 150 minutes, the sticker price isn’t low. But the value shows up in three concrete places.
First, you get the silver. This isn’t a craft where you pay for instruction only. You’re provided recycled 925 sterling silver, and you end with a solid wearable object.
Second, you get the teaching structure. Beginner-friendly does not mean vague. The workshop includes guidance for safe tool use, sizing, shaping, and finishing—plus instruction in English with a small group size limited to 4 participants.
Third, the experience time is real making time, not mostly watching. You cut, hammer, refine, and finish. That matters, because you leave with a ring that took effort, not just a product.
If you’re comparing this to experiences that are more like a curated demo, this workshop holds up better. You’re paying for skill-building and a take-home keepsake.
Gold options are also available at an additional cost if you contact ahead and ask for a quote or design ideas. If that’s in your plan, message early so you don’t end up scrambling mid-session.
The 150 minutes: what the flow feels like from start to finish
Here’s the practical rhythm of the session, in the order you’ll likely experience it:
1) Start at Bennett & Mason and get into the workshop mindset with aprons and a secure spot for belongings.
2) Pick your ring shape and style, then decide which finger you’ll wear it on.
3) Measure and cut to size using a handsaw, guided step by step.
4) Stamp a custom message inside the band with hand stamps you choose.
5) Hammer and shape the silver into a rough ring using mallets and a triblet.
6) Soldering happens as a key demonstration, with heating and joining explained.
7) Fit checks and rounding work so the ring becomes comfortable and properly round.
8) Texture and marking experiments, so your ring has personal character beyond the stamp.
9) Finish selection: polished, satin, or rough forged—then you complete the exterior.
10) Leave with your handmade sterling silver ring, ready to become part of your everyday rotation.
One small downside to plan for: because you’re hands-on with tools, you’ll want to arrive wearing practical clothing. The workshop specifically asks you not to wear high heels or open toe shoes. Wear comfortable shoes and clothes, and keep your attention on instructions.
Who this Bruges workshop suits best (and who should skip)
This is a great fit if you want:
- A keepsake with meaning, not just something you buy
- A hands-on craft experience with a small group
- An activity that works well for couples and special trips—people have described it as a honeymoon highlight, mainly because it creates a lasting, personal object
You may want to think twice if:
- You don’t like tool-based activities at all
- You need wheelchair accessibility, because the workshop is not suitable for wheelchair users
- You’re traveling with young kids; it’s not suitable for children under 9
If you fall into the beginner-friendly category, you’re good. No prior jewelry or silverworking experience is needed.
Practical tips that make the session smoother
Bring comfortable shoes and comfortable clothes, and plan to be on your feet or leaning in for parts of the session. If you need reading help for small work, bring reading glasses.
Also, treat this like a real workshop. The tools include saws, hammers, files, and other specialist equipment, and safety guidance is part of the day. People consistently like the relaxed, patient tone—still, you’ll get better results if you slow down and follow instructions.
If you like planning ahead, think about your inside message before you arrive. Decide on the name/date/short phrase you want, and keep it as simple and readable as possible for a ring band.
And finally: Bruges is pretty, so it’s tempting to make big plans around this. Keep your schedule flexible. You’ll probably want a slow walk afterward with your new ring in mind.
Should you book the Silver Ring-Making Workshop in Bruges?
Yes, if you want a hands-on Bruges memory that you can wear. The small group size, the included materials, and the fact that you actually shape and finish your own sterling 925 silver ring make this feel like a genuine craft experience, not a tourist craft for show.
Skip it if you’re short on time and can’t spare 150 minutes, or if tool-based activities aren’t your thing. Also, if accessibility needs are part of your plan, remember it’s not suitable for wheelchair users.
If you’re on the fence, I’d base your decision on one question: do you want a souvenir you made, with your own message inside? If yes, this workshop is a very strong choice.
FAQ
Where is the meeting point for the workshop?
You’ll meet at Bennett & Mason in the centre of Bruges. Look for the large double red framed windows with the store logo, and ring the bell if the door is closed.
How long is the Bruges silver ring workshop?
The workshop lasts 150 minutes.
How many people are in the group?
It’s a small group limited to 4 participants.
Is the instructor English-speaking?
Yes, the instructor speaks English.
Do I need prior experience with jewellery tools or silverworking?
No prior experience is needed.
What should I bring or wear to the workshop?
Wear comfortable clothes and comfortable shoes. Avoid high heels or open toe shoes. If you need help with close-up work, bring reading glasses.
What’s included in the price?
The price includes all materials (recycled 925 sterling silver), aprons, tea and coffee, soft drinks and water, small snacks, and a secure place to store luggage.
Is the workshop suitable for children or wheelchair users?
It is not suitable for children under 9 years old and it is not suitable for wheelchair users.